
Prototyping is essential for a product from conceptual design to mass production. It helps teams identify design flaws, verify functional feasibility, and significantly reduce the cost of later-stage modifications. Rapid prototyping using 3D printing has become an indispensable part of modern product development.
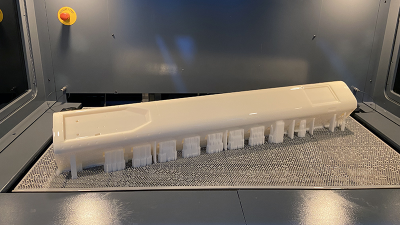
Unlike traditional prototyping involving long cycles and high costs, 3D printing prototyping, based on additive manufacturing principles, can transform a digital model into a physical object in a very short time. It requires no molds, generates little waste, and enables the rapid output of complex geometric structures.
How does 3D printing prototyping work? Read on for more information.
In the early stages of product development, engineers create a preliminary, interactive model (prototype) based on the design concept to validate functionality, test user experience, or communicate design improvements.
Rapid prototyping is an efficient approach to prototyping that emphasizes the use of technologies (primarily 3D printing) or rapid development tools to generate physical prototypes directly from digital models in a very short time (from hours to days). Its core features are speed and iteration, enabling low-cost, multi-round testing and design refinement.
This process supports several levels of prototype fidelity:
• Low-fidelity prototypes are early-stage “proof of concept” models. They focus on basic scale and volume. Often produced using high-speed, lower-resolution settings.
• High-fidelity prototypes more closely reflect the final product. Using technologies like Stereolithography (SLA), high-fidelity models feature smooth surface finishes and fine details.
• Functional prototypes not only match the final product in appearance but also need to meet requirements such as strength, heat resistance, or electrical performance. In such cases, engineering resins or metal materials are required.
Successfully 3D printing prototyping begins with a CAD design. Here are the steps to 3D printing:
Engineers use CAD software to create a precise 3D model. When designing, pay attention to: Is the wall thickness uniform? Are there any overhanging structures? Do supports need to be added?
For mechanical assemblies, providing a clearance of 0.1mm to 0.3mm is often necessary to account for material shrinkage and ensure smooth fitment.
Choosing the right technology for your prototype is vital. Main types include:
• SLA (Stereolithography): Uses a UV laser to cure liquid resin. It is the best choice for high-precision prototypes and complex geometries.
• DLP (Digital Light Processing): Projects an entire layer of UV light onto the resin at once using a digital projector. It works well for small to medium-sized prototypes.
• LCD (Liquid-crystal Display): Uses an LCD screen as a mask to selectively block UV light, curing the resin layer by layer. It’s ideal for cost-effective prototyping and small-batch production.
Material selection must align with the prototype’s goal. For a purely visual 3D printing prototype, standard resins are sufficient. However, for functional testing, you might select high-temperature resins (for automotive under-the-hood parts) or biocompatible resins (for medical device housing).
Once the design and material are set, the CAD file is exported, usually as an STL file, and imported into software.
Factors like layer height, resolution, and orientation are decided here to adjust size, accuracy, and construction effect. Proper orientation is crucial to minimize “stair-stepping” on curved surfaces and to ensure the part can withstand the mechanical loads during the print process.
In professional-grade 3D printing prototyping, the work continues after the machine stops. Post-processing involves:
• Support Removal: Carefully removing the structures that held the part in place.
• Washing: Removing excess uncured resin.
• UV Curing: Placing the part in a UV oven to finalize the polymerization process, reaching full mechanical strength.
• Surface Finishing: Sanding, bead blasting, or painting to achieve the desired effect.
The final step is the “Test-Modify-Repeat” cycle. Engineers evaluate the part for dimensional accuracy. Functional prototypes are subjected to load tests or assembly checks. Any failure at this stage is fed back into the CAD design for the next iteration.
The integration of 3D printing prototyping into the R&D workflow offers transformative benefits:
Traditionally, creating a prototype could take weeks due to mold making. With rapid 3D prototyping, the cycle is compressed into hours. This allows teams to validate and fix fast.
No molds, no special fixtures, no minimum order quantity. For small-batch prototypes, the cost advantages of 3D printing for prototyping are very clear. Even if design modifications are needed, you simply update the digital model.
Because there is no physical mold, making a design change is as simple as updating a digital file. This encourages trying multiple solutions, producing several designs simultaneously to compare performance.
3D printing handles complex internal channels, organic shapes, and interlocking parts that are hard to create via CNC or molding.
Beyond just the initial 3D printing prototype, these machines can handle customization and production. For products that require personalized customization, such as medical devices and hearing aids, 3D printing prototyping makes the process simple.
The versatility of rapid prototyping 3D printing has led to its adoption across almost every industrial sector:
• Automotive: Manufacturers use 3D printing for prototyping to create dashboard consoles, specialized assembly tools, and even aerodynamic components for wind-tunnel testing.
• Aerospace: High-strength, lightweight prototypes are used to validate engine components and interior cabin fixtures where weight reduction is the primary engineering goal.
• Consumer Electronics: From lamp casings to wearable tech, 3D printing prototyping ensures that designs meet users’ expectations.
• Medical Devices: Surgeons use patient-specific anatomical models for pre-operative planning, while R&D teams use them to prototype surgical instruments and prosthetic limbs.
• Consumer Goods: Designers for footwear, kitchenware, and outdoor structures use 3D prints to evaluate aesthetic trends and structural durability.
For enterprises seeking to apply 3D printing prototyping, UnionTech offers advanced SLA, DLP, and LCD solutions that define industry standards for accuracy and reliability.
If your goal is 3D rapid prototyping with industrial-scale requirements, the UnionTech RSPro Series is highly recommended. For instance, the RSPro 1800 features a massive build envelope of 1800×900×600 mm, a scanning speed of 8-15m/s, and dimensional accuracy of ±0.2 mm, allowing for creating large-scale parts or multiple smaller components precisely and quickly.
For those focusing on high-resolution dental or specialized consumer electronics, our DLP and LCD technology offer extreme detail with smooth surface finishes. These printers are compatible with a variety of materials.
Embracing 3D printing prototyping is essential for staying competitive in today’s fast-paced market. By following a structured design and testing workflow, companies can reduce costs and innovate faster.
With UnionTech’s 3D printing technology, you can ensure every prototype reflects your vision. Feel free to contact UnionTech now if you have any needs!


